Quick fix • Updated Mar 18, 2026 • 10 min read
Clogged faucet aerator: quick clean for better flow
This is probably the easiest fix in the entire guide collection, and it's the one I wish every renter knew about. If your kitchen or bathroom faucet has gone from a smooth, even stream to a weak trickle or a sideways spray, it's almost certainly the aerator--that little screened cap at the tip of the faucet. Mineral grit and sediment collect in the screen over time, especially in hard water areas, and it takes about five minutes to clean.
You don't need to call anyone. You don't need tools (usually). And you definitely don't need to replace anything.
I clean aerators constantly on the job, and every time I do it in front of a tenant they have the same reaction: "That's it?" Yes, that's it. A five-minute soak, a quick scrub, and the faucet works like new. It's the kind of thing that feels too simple to be the real fix, but it almost always is. Let me walk you through it.
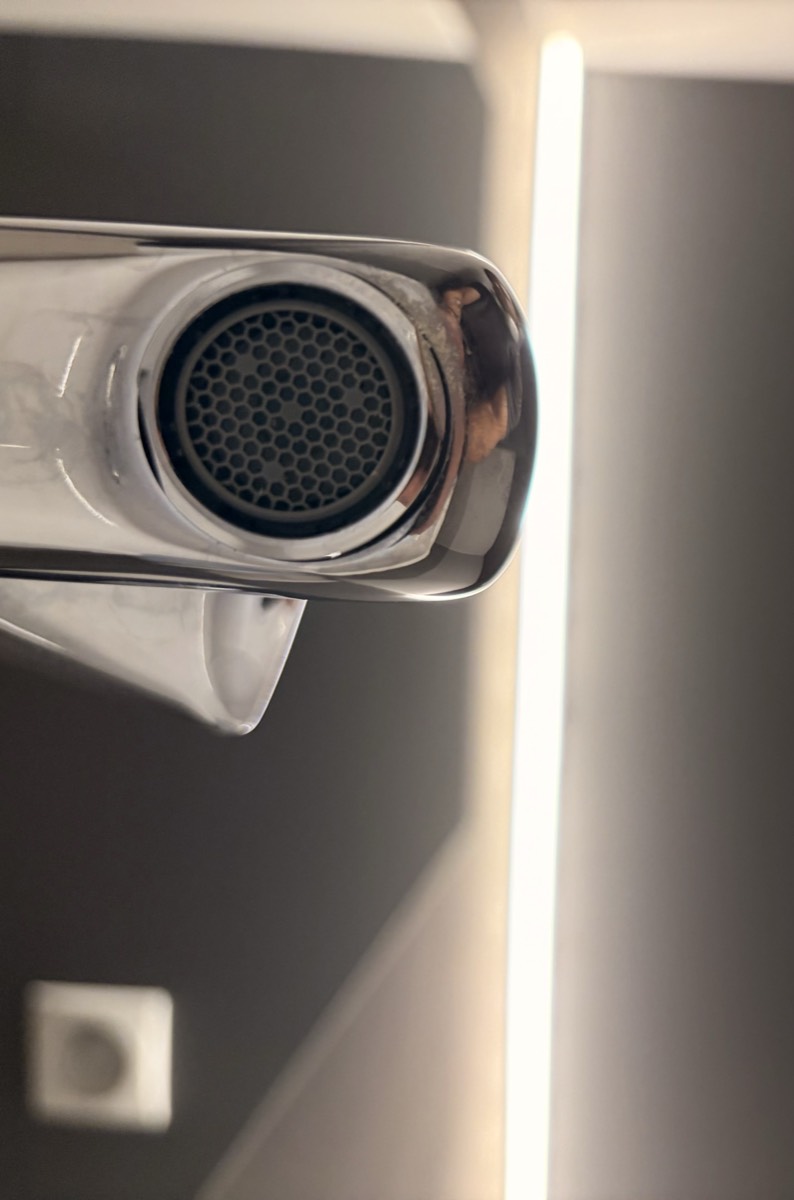
What is a faucet aerator (and why does it clog)?
The aerator is a small, round attachment threaded onto the end of nearly every modern faucet. Inside it, you will find a fine mesh screen (sometimes two or three layered screens), a flow restrictor disc, a rubber washer, and a threaded housing that holds everything together.
Its job is to mix air into the water stream so you get a smooth, splash-free flow that uses less water. The mesh openings are very small, which means they trap anything the water carries: calcium and lime deposits from hard water, tiny rust flakes from aging pipes, sand or sediment after municipal water work, and even small rubber particles from deteriorating washers upstream.
In hard-water areas, mineral scale builds up gradually and narrows the mesh openings until the stream becomes uneven, splits into multiple directions, or slows to a frustrating trickle. In areas with older pipes, sediment can clog an aerator in weeks after a water main repair.
Quick diagnosis table
| Symptom | Likely cause | What to do |
|---|---|---|
| Weak, even flow from faucet | Mineral scale partially blocking mesh | Clean the aerator (this guide) |
| Water sprays sideways or splits | Uneven clog pushing water through some holes | Clean the aerator (this guide) |
| Flow is fine but water looks cloudy/milky | Air in pipes (not the aerator) | Run faucet for 30 seconds; if it clears, no action needed |
| All faucets in the unit are low | Building pressure issue or shutoff valve partially closed | Document and contact maintenance |
| Only hot water is weak | Water heater or hot-side valve issue | Contact maintenance |
| Faucet drips after shutoff | Worn cartridge or washer inside faucet body | Contact maintenance (internal repair) |
| Sudden total loss of flow | Sediment plug or upstream shutoff | Check other faucets; contact maintenance if widespread |
Tools and supplies
You probably have everything already. Here is what you need:
- White vinegar (store-brand is fine; you need about one cup)
- Small bowl or cup (deep enough to submerge the aerator)
- Old toothbrush (for scrubbing the screen)
- Toothpick or sewing needle (for clearing individual holes in stubborn cases)
- Rag or rubber grip pad (helps unscrew without scratching the finish)
- Optional: channel-lock pliers wrapped in a rag (only if the aerator is stuck tight)
- Optional: towel for the sink drain (so small parts do not fall in)
Total cost if you need to buy vinegar and a toothbrush: under $3. Time: 5 minutes of hands-on work plus soak time.
Step-by-step: cleaning your faucet aerator
Step 1: Cover the drain
The aerator contains small parts (screens, washer, housing). Drop one down the drain and your easy fix becomes a frustrating loss. Place a towel or stopper over the sink drain before you start. This takes two seconds and saves real headaches.
Step 2: Unscrew the aerator
Grip the aerator housing at the tip of the faucet and turn it. Most aerators unscrew clockwise when viewed from below (because the threads are on the outside of the spout). If you are looking straight down at the faucet, that means turning it to the left.
- Try by hand first. Many aerators come off with just your fingers.
- If it will not budge, wrap a rubber grip pad or a thick rubber band around the housing for traction.
- Still stuck? Wrap a rag around the aerator and use channel-lock pliers very gently. The rag prevents scratches on the chrome or brushed nickel finish.
- If the aerator absolutely will not move, do not force it. Forcing risks cracking the housing or damaging the faucet threads. At that point, you can try the "bag soak" method (described below) without removing it.
Step 3: Disassemble and note the order
Once the aerator is off, you will see it is made of several stacked parts: the outer housing, one or more mesh screens, a flow restrictor (a small plastic disc with a hole), and a rubber washer. Take a quick photo with your phone before pulling them apart. This makes reassembly simple and prevents the "which way does the screen go?" guessing game.
Lay the parts out on the towel in the order they came apart. Some aerators are a single sealed unit that cannot be disassembled further. That is fine; you will soak and scrub it as one piece.
Step 4: Soak in vinegar
Place all the parts in a small bowl and pour enough white vinegar to cover them completely. The acetic acid in vinegar dissolves calcium and lime deposits without damaging the metal or plastic components.
- Light buildup (slightly reduced flow): 15-20 minutes is usually enough.
- Heavy buildup (visible white/green crust, seriously reduced flow): soak for 30 minutes to an hour. For truly stubborn scale, you can leave parts overnight, but check on them periodically.
- Warm vinegar works faster than cold. Microwave the vinegar for 20-30 seconds before pouring it over the parts if you want to speed things up.
Alternative: citric acid powder dissolved in warm water works well too, especially if you dislike the vinegar smell. About one tablespoon per cup of water.
I'll tell you a quick story. A few years ago I got a call from a tenant who was convinced her kitchen faucet was dying. She'd been dealing with a pathetic trickle for weeks and was already researching faucet replacements to suggest to her landlord. I unscrewed the aerator, dropped it in a cup of vinegar on her counter, and we stood there making small talk for fifteen minutes. When I scrubbed it clean and put it back, full pressure came back instantly. She just stared at me. "I almost submitted three maintenance tickets for that." Now she cleans the aerator herself every couple of months and hasn't called about the kitchen faucet since.
Step 5: Scrub the screens
After soaking, take the mesh screen and scrub both sides with an old toothbrush under running water. The vinegar soak loosens the deposits; the brush removes them. You should see debris coming off and the individual mesh holes opening up.
- For holes that are still blocked, use a toothpick or sewing needle to gently clear each one. This is tedious but effective on heavily scaled screens.
- Rinse the flow restrictor disc and clear its central opening as well.
- Inspect the rubber washer. If it is cracked, brittle, or deformed, it may cause a slight drip when reinstalled. Replacement washers cost pennies at a hardware store, but note: a dripping faucet is a maintenance issue regardless.
Step 6: Rinse everything thoroughly
Hold each part under running water for a few seconds. You want to flush out any remaining loose debris and vinegar residue. Shake the screen gently to clear trapped particles.
Step 7: Reassemble and reinstall
Stack the parts back together in the order you photographed. Screw the aerator back onto the faucet tip by hand. Snug it finger-tight, then give it a small extra turn. You do not need pliers; over-tightening can crack the housing or strip the threads.
Turn the faucet on. You should see a noticeably improved, even stream. If the flow is better but still not great, remove and soak again for a longer period, or consider that the issue may be upstream (see "When to call maintenance" below).
The bag soak method (if the aerator will not unscrew)
Sometimes the aerator is corroded in place or your lease makes you nervous about removing any fixture parts. In that case, you can clean it in place:
- Fill a small plastic bag halfway with white vinegar.
- Place the bag over the faucet tip so the aerator is submerged in the vinegar.
- Secure the bag with a rubber band around the faucet neck.
- Leave it for 30-60 minutes (or overnight for heavy scale).
- Remove the bag, turn the faucet on full for 30 seconds to flush debris.
This method is less thorough than removing and scrubbing, but it dissolves a significant amount of scale and often restores enough flow to make a difference. You can repeat it weekly until the buildup is manageable.
Different aerator types (what you might find)
Not all aerators look the same. Knowing what type you have helps if you need to describe it to maintenance or buy a replacement washer.
| Type | How to identify | Removal |
|---|---|---|
| External thread (most common) | Threaded housing visible on the outside of the faucet tip | Unscrew by hand or with padded pliers |
| Internal thread (cache aerator) | No visible housing; the aerator sits inside the spout | Requires a special cache aerator key (a small plastic tool) to unscrew. Your faucet brand may include one, or use the bag soak method instead. |
| Swivel/ball-joint aerator | The spout tip rotates or pivots | Grip the stationary base and unscrew the tip; the swivel joint stays attached to the faucet |
| Pull-down sprayer (kitchen) | The spray head pulls out on a hose | Many spray heads have a built-in screen. Check the inlet where the hose connects to the head. Some unscrew; some snap out. |
If you have a cache (internal) aerator and no removal key, the bag soak is your best renter-safe option. Cache aerator keys are available at hardware stores for a few dollars, but verify the size matches your faucet brand before buying one.
How often should you clean the aerator?
It depends on your water quality:
- Hard water areas (you see white scale on fixtures regularly): every 2-3 months, or whenever flow noticeably drops.
- Moderate water: every 4-6 months as part of your seasonal maintenance routine (see the renter maintenance checklist).
- Soft water / newer pipes: once or twice a year is usually plenty.
- After water main work: if your city or building does pipe maintenance, run faucets for a few minutes afterward to flush sediment. Clean the aerator within a day or two if you notice reduced flow.
Common mistakes renters make
- Not covering the drain. The mesh screen is small. The rubber washer is smaller. Losing either one down the drain turns a 5-minute fix into a trip to the hardware store or a maintenance call.
- Using pliers directly on the finish. Chrome and brushed nickel scratch easily. Always wrap with a rag or rubber pad before using any tool on the aerator housing.
- Over-tightening on reinstall. Hand-tight plus a quarter turn is plenty. Cranking with pliers risks cracking the plastic components inside or cross-threading the housing.
- Using harsh chemicals instead of vinegar. CLR, muriatic acid, and other strong descalers can damage rubber washers, discolor finishes, and are overkill for this job. Vinegar handles aerator scale just fine.
- Forgetting to flush after a soak. If you do the bag method and do not run the faucet afterward, loosened debris can resettle in the screen and you will be right back where you started.
- Reassembling in the wrong order. The washer typically goes against the faucet threads, then the screen(s), then the restrictor, then the outer housing. If the screen is upside down or the restrictor is missing, the flow will feel off. That is why the phone photo in step 3 matters.
What if cleaning does not fix the flow?
If you clean the aerator thoroughly and the flow is still weak, the problem is upstream. A few possibilities:
- Supply valve partially closed. Under the sink, there are hot and cold shutoff valves. If someone turned one partway closed (a previous repair, a curious previous tenant), the flow will be restricted regardless of aerator condition. You can check visually: the handle should be fully open (parallel to the pipe for lever valves, fully counter-clockwise for round handles). If it looks closed, open it gently. If it is seized or you are unsure, leave it and file a maintenance request.
- Clogged supply lines. Older buildings with galvanized pipes can develop internal corrosion that restricts flow. This is not something a renter can or should address.
- Building-wide pressure issue. If other tenants are also experiencing low flow, the issue is systemic.
- Cartridge or valve issue inside the faucet body. This requires disassembling the faucet handle and is maintenance territory.
When to call maintenance
Cleaning the aerator is renter territory. Everything else below is not:
- Flow is still weak after cleaning and the shutoff valves under the sink are fully open.
- Multiple faucets are affected at the same time (building pressure or main valve issue).
- The aerator housing is cracked or corroded and needs replacement (the part itself costs a few dollars, but the landlord should know).
- Water is discolored (brown, orange, or yellow) even after running for several minutes. This indicates pipe corrosion upstream.
- You hear banging or hammering when you turn faucets on or off (water hammer; a plumbing issue).
- The faucet drips from the spout or base after turning off. That is an internal cartridge or washer problem.
Maintenance request template (copy/paste)
Subject: Low faucet water pressure in [kitchen/bathroom] — aerator cleaned, issue persists
Hi [Landlord/Maintenance], the [kitchen/bathroom] faucet has had low water pressure since approximately [date]. I cleaned the aerator (soaked in vinegar and scrubbed the screen), which improved flow slightly but did not fully resolve the issue. The shutoff valves under the sink appear fully open. Other faucets in the unit are [normal / also affected]. Could you please inspect the supply lines and faucet internals? I'm available [times] and can share photos if helpful. Thank you.
Connecting the dots: aerators and shower pressure
If your faucet aerator is heavily scaled, your showerhead screen is probably in similar shape. Hard water does not discriminate. While you have the vinegar out, consider soaking the showerhead face as well (see our guide on low shower pressure checks). The same mineral deposits that clog your faucet mesh also leave white stains on shower glass (see hard water stain removal).
Adding aerator cleaning to your seasonal routine keeps this problem from creeping back. Our renter maintenance checklist includes quarterly faucet checks alongside other quick tasks that prevent bigger issues.
The 2-minute prevention habit
Once you have cleaned the aerator and restored flow, a small habit keeps it flowing:
- Weekly: After cleaning the sink, run the faucet on full for 10 seconds. This flushes loose particles before they settle into the screen.
- Monthly: Wipe the aerator face with a vinegar-dampened cloth. This dissolves early-stage scale before it hardens.
- After any water shutoff or maintenance work: Run every faucet for 1-2 minutes to flush debris that gets dislodged during repairs. Check the aerator a few days later.
A note on water quality
If your aerator clogs frequently (every few weeks), your building may have unusually hard water or deteriorating supply pipes. This is worth mentioning to your landlord, not as a complaint, but as useful data. Frequent aerator clogging is an early indicator of pipe issues that get worse over time. A simple note like "I've been cleaning the aerator monthly and it's consistently clogged with [white scale / rust-colored sediment]" gives maintenance a useful signal.
Related guides
- Low shower pressure: 6 checks before calling maintenance
- Hard water stains on shower glass
- How to fix a slow drain safely
- Renter maintenance checklist
- Renter Maintenance Handbook (start here)
Was this guide helpful? Have a correction or tip? Email [email protected].

Renter for 15+ years. I write practical, landlord-safe fixes I've actually done in my own apartments — no permits, no drama, deposit intact. More about me →